Some successful flights, indeed! Really exciting to see such results.
You mentioned about 60% power, approximately how many winds on the rubber?
Build a 400 series WW2 Fighter for less than $20
Re: Build a 400 series WW2 Fighter for less than $20
Thanks Wildpig...
It seems to work fine with the peg hole where you said... and it's right in the middle of the Black Cross so it's nearly impossible to see... when the peg is in, I painted the ends BLACK.
Here is Willy and Hans doing a "fly over" the work shop.
I think the model might almost be TOO LIGHT if that is a problem... Just a slight breeze upsets her balance. It was very noticable to me, even in the glide tests.
I have only gotten pictures of the planes in flight when someone was there to help... No one on the field today... I was practicing with the video record feature the other day and hope to have action videos soon...
OKAY OKAY ANSWER the question... 30 or 60 % was only a guestimate... This is the first time I used tan rubber, I streched it and lubed, and took it out of the model after flight... The early flights were so short and Fredrich kept rolling over into a dive and crash... Fredrich ended up with very little trim control as she is so light. Each time she crashed, half the winds were still on... I would wind back up and add a bit more...
The final flights... 30 % was just a "feel" The rubber was starting to go into the double knots... 60% was double knots and starting to twist into the third... That's the best I can say... The tan rubber is so soft and smooth running, next time I will do the MATH and count the turns... and YES I have wound rubber until destruction and DO NOT want to do that in a model again...
Mitch
PS. I used the decals to do the repair work to Emil, all of Fredrich's markings are printed paper. I decided to glue them on with the glue stick as that worked better than relying on the dope to do all the work.
It seems to work fine with the peg hole where you said... and it's right in the middle of the Black Cross so it's nearly impossible to see... when the peg is in, I painted the ends BLACK.
Here is Willy and Hans doing a "fly over" the work shop.

I think the model might almost be TOO LIGHT if that is a problem... Just a slight breeze upsets her balance. It was very noticable to me, even in the glide tests.
I have only gotten pictures of the planes in flight when someone was there to help... No one on the field today... I was practicing with the video record feature the other day and hope to have action videos soon...
OKAY OKAY ANSWER the question... 30 or 60 % was only a guestimate... This is the first time I used tan rubber, I streched it and lubed, and took it out of the model after flight... The early flights were so short and Fredrich kept rolling over into a dive and crash... Fredrich ended up with very little trim control as she is so light. Each time she crashed, half the winds were still on... I would wind back up and add a bit more...
The final flights... 30 % was just a "feel" The rubber was starting to go into the double knots... 60% was double knots and starting to twist into the third... That's the best I can say... The tan rubber is so soft and smooth running, next time I will do the MATH and count the turns... and YES I have wound rubber until destruction and DO NOT want to do that in a model again...
Mitch
PS. I used the decals to do the repair work to Emil, all of Fredrich's markings are printed paper. I decided to glue them on with the glue stick as that worked better than relying on the dope to do all the work.
- Mitch
- Posts: 1347
- Joined: Mon Aug 22, 2011 9:16 pm
- Location: Kent, WA
Re: Build a 400 series WW2 Fighter for less than $20
youve built a beautifull plane! im new to balsa, i learned a lot from your photos, tools, workboard, etc. 
- npazzin
- Posts: 13
- Joined: Mon Aug 27, 2012 10:22 am
- Mitch
- Posts: 1347
- Joined: Mon Aug 22, 2011 9:16 pm
- Location: Kent, WA
Re: Build a 400 series WW2 Fighter for less than $20
Looking good. Nice job handling the model and the video camera.
That climb and stall under power , then turns and heads for the ground looks like a little downthrust is needed. That's assuming it glides as well as your FW in the other video.
By the way, that's some pretty nice weather your having there.
That climb and stall under power , then turns and heads for the ground looks like a little downthrust is needed. That's assuming it glides as well as your FW in the other video.
By the way, that's some pretty nice weather your having there.
- Wildpig
- Posts: 529
- Joined: Thu Jan 26, 2012 9:41 am
Re: Build a 400 series WW2 Fighter for less than $20
Yes, all the models need some fine tuning on flight trim. I was looking at the flight of the P-51 and it needs adjusting also. I really need to make a proper stooge. I am now back to winding the models by hand. I really need to measure and wind to near maximum power. I am suprized also how the models still fly fairly well with a bent shaft... I straighten it out as best I can in the field, but I see it wobble and the plane still flys. I was afraid to install spinners because they might not be balanced, but seeing this wobble, I think the spinner would cause no problem.
The FW was not flying at all well under power, tail heavy. I took the peg out and the rubber came to the nose took off the prop, and with the wt of the rubber in the nose that was the gluide you saw, I liked that also. I think the FW is going to make a very good flyer!
I appriciate your advice and observations of the models, as I am not sure if its down thust, trim tab or cg that needs to be changed.
As for the weather in Seattle, August is the dryest month. I think it will start raining again soon and then stop in June or July...
Mitch
The planes absorb the impact well. The only damage lately has been to the shafts, which I straighten out and use again
The FW was not flying at all well under power, tail heavy. I took the peg out and the rubber came to the nose took off the prop, and with the wt of the rubber in the nose that was the gluide you saw, I liked that also. I think the FW is going to make a very good flyer!
I appriciate your advice and observations of the models, as I am not sure if its down thust, trim tab or cg that needs to be changed.
As for the weather in Seattle, August is the dryest month. I think it will start raining again soon and then stop in June or July...
Mitch

The planes absorb the impact well. The only damage lately has been to the shafts, which I straighten out and use again
- Mitch
- Posts: 1347
- Joined: Mon Aug 22, 2011 9:16 pm
- Location: Kent, WA
Re: Build a 400 series WW2 Fighter for less than $20
If you get them to glide properly by adjusting tabs and ballast with a nice flat, long glide; with none of that-- pitch up, dive ...pitch up , dive .... dipsy doo stuff, then the basic trim is set. And then with powered flight it climbs and when the rubber band is about half gone, it stalls in the climb and then turns and heads for the ground in retreat; I would say that it needs downthrust. How much???? Just experiment.
Yeah, man. Get a stooge. I want to see how they perform when you really pack in the winds.
September to June is the rainy season?

Aside from summer droughts, September and October are usually fairly dry with excellent flying weather, here in the southeast USA.
Yeah, man. Get a stooge. I want to see how they perform when you really pack in the winds.
September to June is the rainy season?
Aside from summer droughts, September and October are usually fairly dry with excellent flying weather, here in the southeast USA.
- Wildpig
- Posts: 529
- Joined: Thu Jan 26, 2012 9:41 am
Re: Build a 400 series WW2 Fighter for less than $20
Hey Guys... I had to dig deep to pull this one back to life...
I was planning on going to the FAC event and hoping this one would be my best bet... I want to show something worthy... Anyway reading though the rules and this Bf109 needs to get finished and ready for the fight of her life!
She will need at a minimum...
1. Mg's in 3d
2. All control surfaces outlined
3. Air scoops and exhaust in 3d
4. Tail struts
5. Landing Gear doors marked in.
6. Wing fillets (at least the triangle piece, if not the entire wing to fuse flair)
I will ask for you advice and criticism, I also plan to bring a few other models, but this Bf109f Miss Fredrich is in the shop this week...
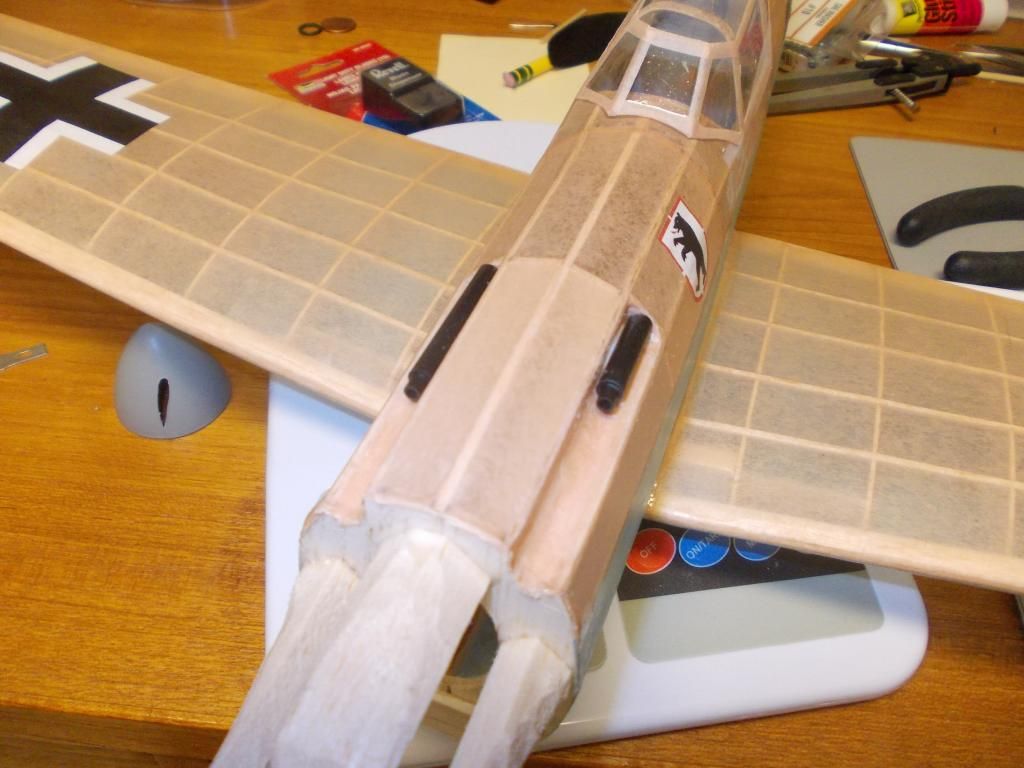
Here she is getting her mg's fitted, her cowling is removed and wt will be changed...
I've chosen to feature Miss Fredrich because she has already been developed with you support and advice!
Mitch
PS She will need a flight time of at least 20 seconds... I only started "really" flying these models last spring... I have tan rubber and with your advice will try to get the most flight time out of Miss Fredrich...
I was planning on going to the FAC event and hoping this one would be my best bet... I want to show something worthy... Anyway reading though the rules and this Bf109 needs to get finished and ready for the fight of her life!
She will need at a minimum...
1. Mg's in 3d
2. All control surfaces outlined
3. Air scoops and exhaust in 3d
4. Tail struts
5. Landing Gear doors marked in.
6. Wing fillets (at least the triangle piece, if not the entire wing to fuse flair)
I will ask for you advice and criticism, I also plan to bring a few other models, but this Bf109f Miss Fredrich is in the shop this week...

Here she is getting her mg's fitted, her cowling is removed and wt will be changed...
I've chosen to feature Miss Fredrich because she has already been developed with you support and advice!
Mitch
PS She will need a flight time of at least 20 seconds... I only started "really" flying these models last spring... I have tan rubber and with your advice will try to get the most flight time out of Miss Fredrich...
- Mitch
- Posts: 1347
- Joined: Mon Aug 22, 2011 9:16 pm
- Location: Kent, WA
Re: Build a 400 series WW2 Fighter for less than $20
Wow super nice BF 109 you got there. Please keep us posted.
- WIDDOG
- Posts: 872
- Joined: Tue Aug 25, 2009 5:34 am
- Location: West Virginia USA
Re: Build a 400 series WW2 Fighter for less than $20
Thanks WD... just want to have a respectable showing... I want to have fun... also reading though the rules I see I don't get any bonus for more ribs... I will use this model as a test and learn to build to their rules... She needs to look good and fly well. I am worried about getting her flight time higher. But we have some time to work on that... about a week, because I need to get some other models ready. M 
UPDATE:
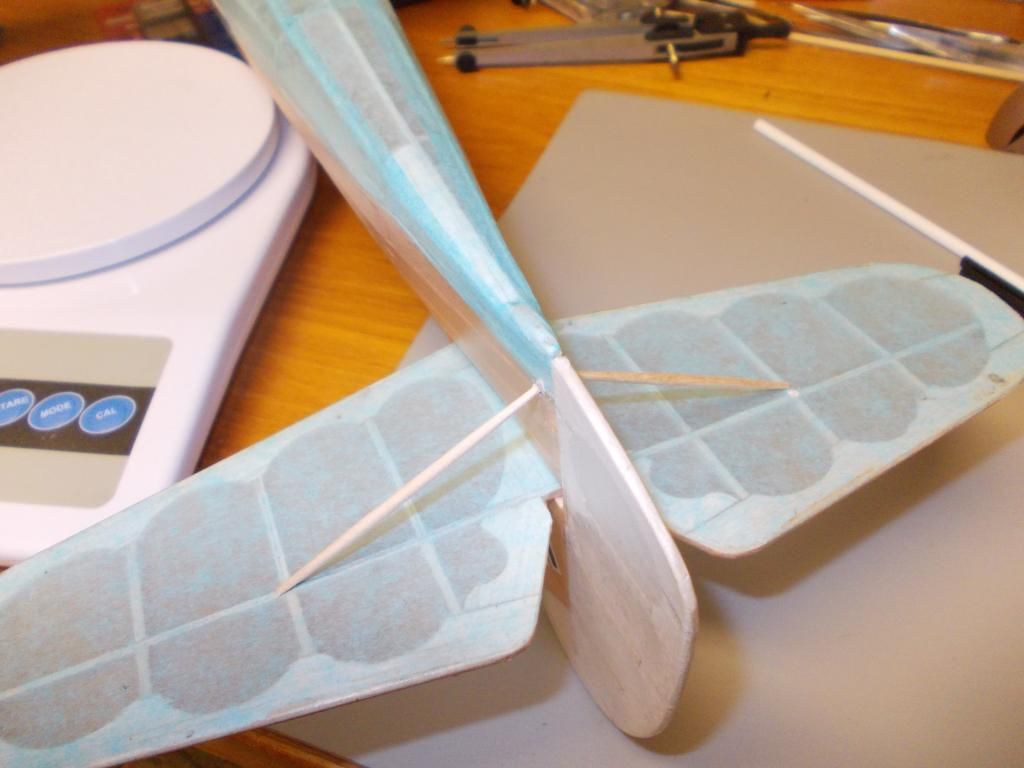
Installing the stabilizer struts, using toothpics because I do not believe balsa would hold up well. I drilled small receiver pockets for the struts to fit into. I will need to paint or cover the struts with paper and install. The rear of the fuselage is solid balsa... I planned ahead for the tail wheel!
UPDATE:

Installing the stabilizer struts, using toothpics because I do not believe balsa would hold up well. I drilled small receiver pockets for the struts to fit into. I will need to paint or cover the struts with paper and install. The rear of the fuselage is solid balsa... I planned ahead for the tail wheel!
- Mitch
- Posts: 1347
- Joined: Mon Aug 22, 2011 9:16 pm
- Location: Kent, WA
Re: Build a 400 series WW2 Fighter for less than $20
I just wanted to draw to your attention a really great video. It's from a member Ateseus.
http://youtu.be/8ilwRVJ1rKM. I copied it from a Thread on this forum so I hope it’s ok for me to re post.
Anyway on the YouTube info he is nice enough to give out the “Set Up” he used… AUW 111g, 4x18” loops of 1/8 “ tan rubber….Peck Polymer 9.5” inch propeller trimmed down to 8 inches.
http://youtu.be/8ilwRVJ1rKM. I copied it from a Thread on this forum so I hope it’s ok for me to re post.
Anyway on the YouTube info he is nice enough to give out the “Set Up” he used… AUW 111g, 4x18” loops of 1/8 “ tan rubber….Peck Polymer 9.5” inch propeller trimmed down to 8 inches.
- WIDDOG
- Posts: 872
- Joined: Tue Aug 25, 2009 5:34 am
- Location: West Virginia USA
Re: Build a 400 series WW2 Fighter for less than $20

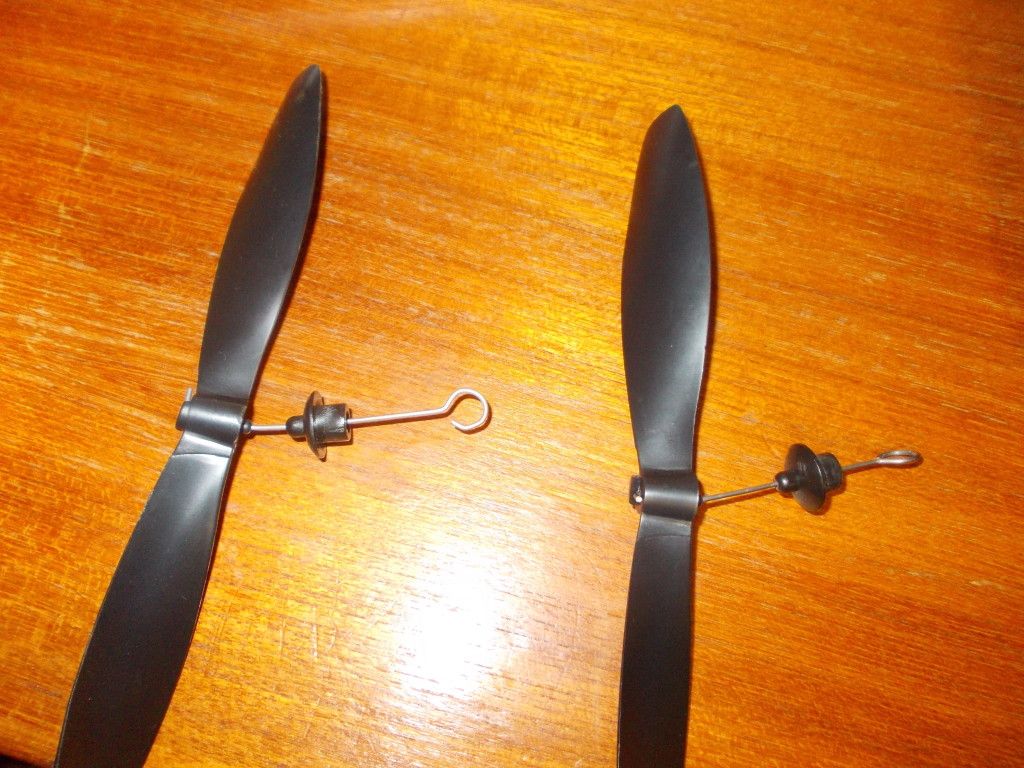
I saw some photo’s with bent propeller shafts. I am trying to post a photo on how to bend your own propellers shafts. It is from Bill Warner’s book “Building the Sky Bunny”. What I do is order, from Guillow’s, the landing gear wire for the Arrow. It is thick enough to hold up to some pretty tough crashes but also thin enough to fit into the propeller hub.
BTW the picture represents the view of the wire in the Needle Nose Pliers.
- WIDDOG
- Posts: 872
- Joined: Tue Aug 25, 2009 5:34 am
- Location: West Virginia USA
Re: Build a 400 series WW2 Fighter for less than $20
That looks very good, although a bit hard to read(out of focus)... always something new... My LHS carries different size music wire with there balsa display...
Here is the progress report for the day:
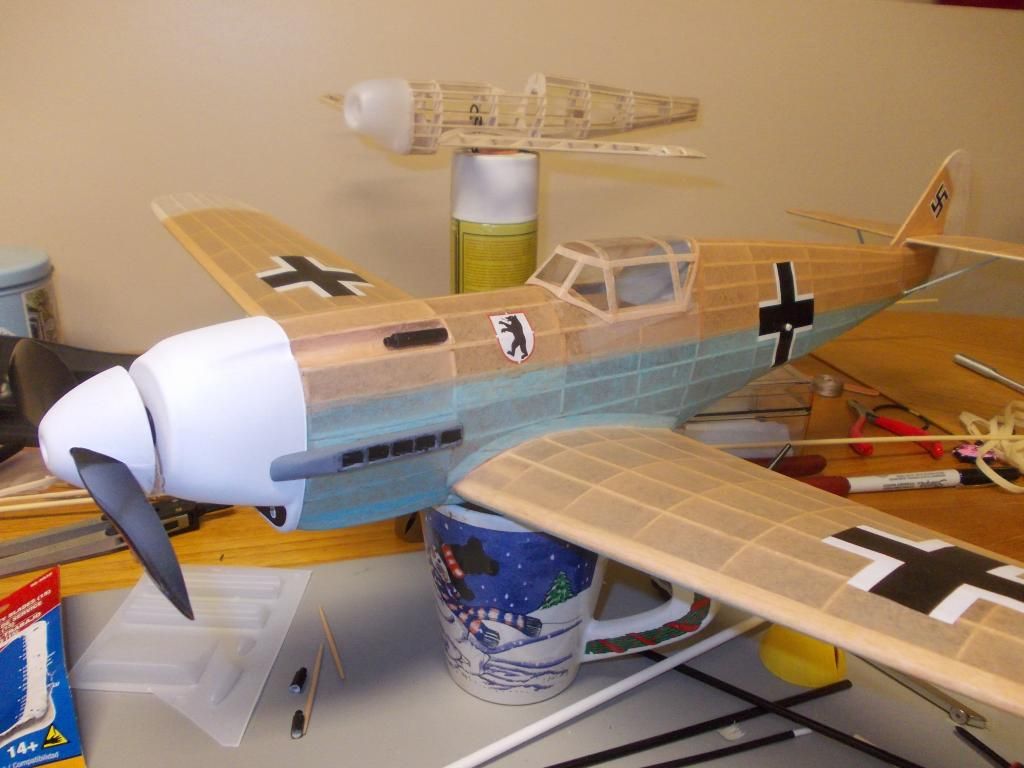
Exhaust mounted, also tail struts, made wing mg's and will mount them tomorrow...
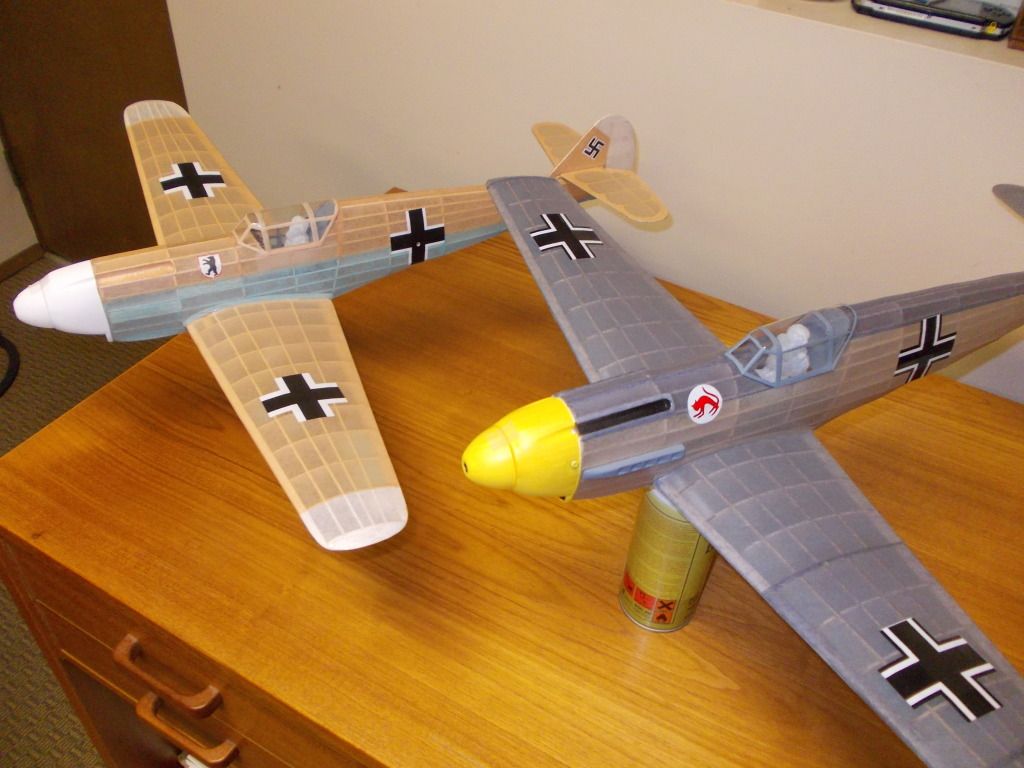
Still need some tweeking on the spinner... and there's a 500 series skeleton flying as my wingman! Mitch
PS. Now that I look at it in preview...it makes a good picture... in reality the 500 series is right next to the 400.
Here is the progress report for the day:

Exhaust mounted, also tail struts, made wing mg's and will mount them tomorrow...
Still need some tweeking on the spinner... and there's a 500 series skeleton flying as my wingman! Mitch
PS. Now that I look at it in preview...it makes a good picture... in reality the 500 series is right next to the 400.
- Mitch
- Posts: 1347
- Joined: Mon Aug 22, 2011 9:16 pm
- Location: Kent, WA
Re: Build a 400 series WW2 Fighter for less than $20
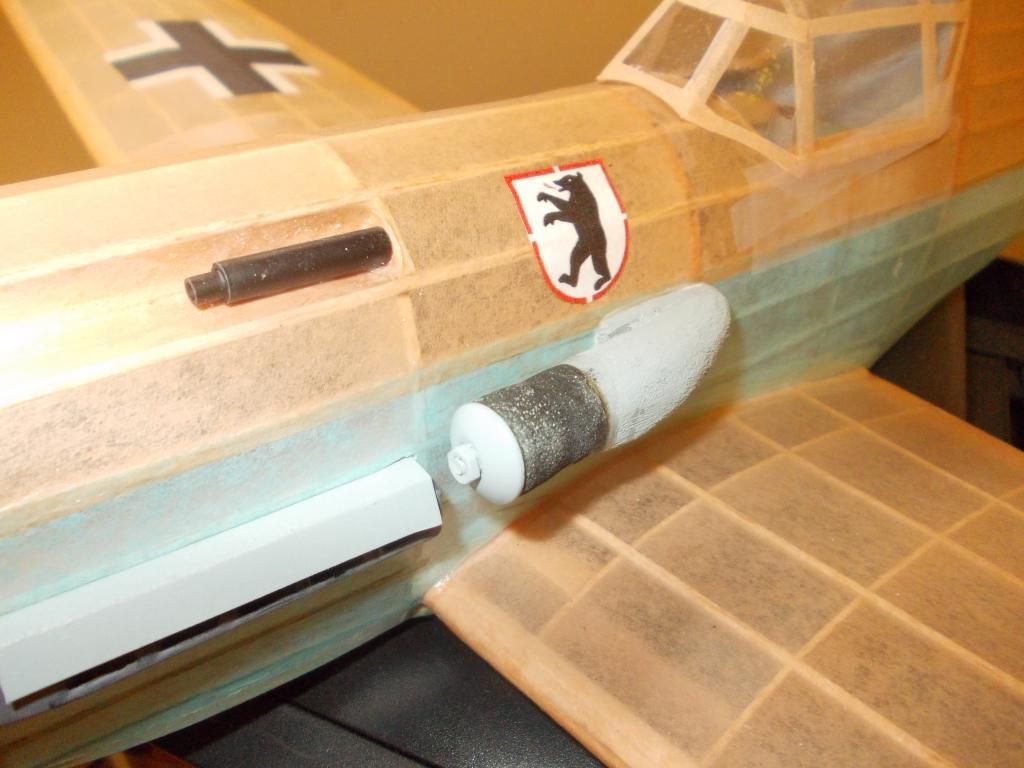
Its all in the details... when you go to a contest... I don't know what they are called, but I installed my "flame exhaust deflectors" Still need to mount the air intake on the port side with "Desert Dust Filter"...
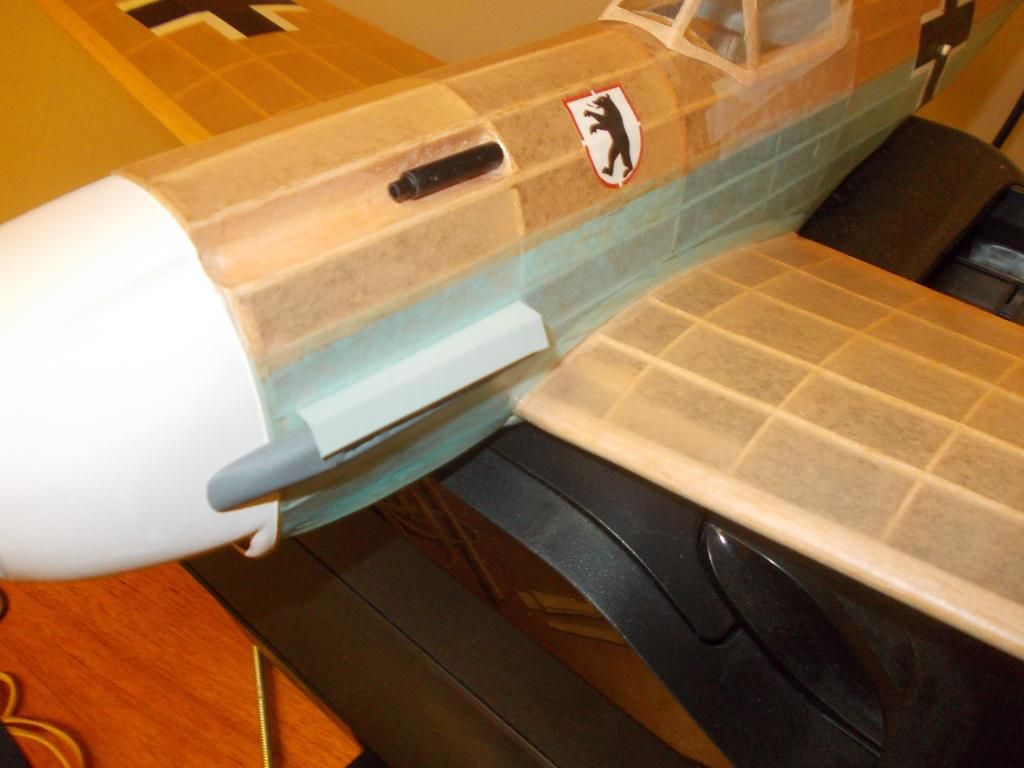
Just a piece of Manila folder paper, painted the Luftwaffe Blue. I inserted it into a slot I pre-planned to have this when I built the framework of the 109. The Air Intake will be mounted just under the Squadron LOGO. This is filled in with balsa stock to be the "back plate" to hold the Air Intake.
Mitch
- Mitch
- Posts: 1347
- Joined: Mon Aug 22, 2011 9:16 pm
- Location: Kent, WA
- Mitch
- Posts: 1347
- Joined: Mon Aug 22, 2011 9:16 pm
- Location: Kent, WA
Return to General Building Questions
Who is online
Users browsing this forum: No registered users and 50 guests

