1903 Wright build

Ask other modelers for a little help / knowledge ?

1903 Wright build

Postby markm » Mon Mar 31, 2014 10:40 am

Hi all,

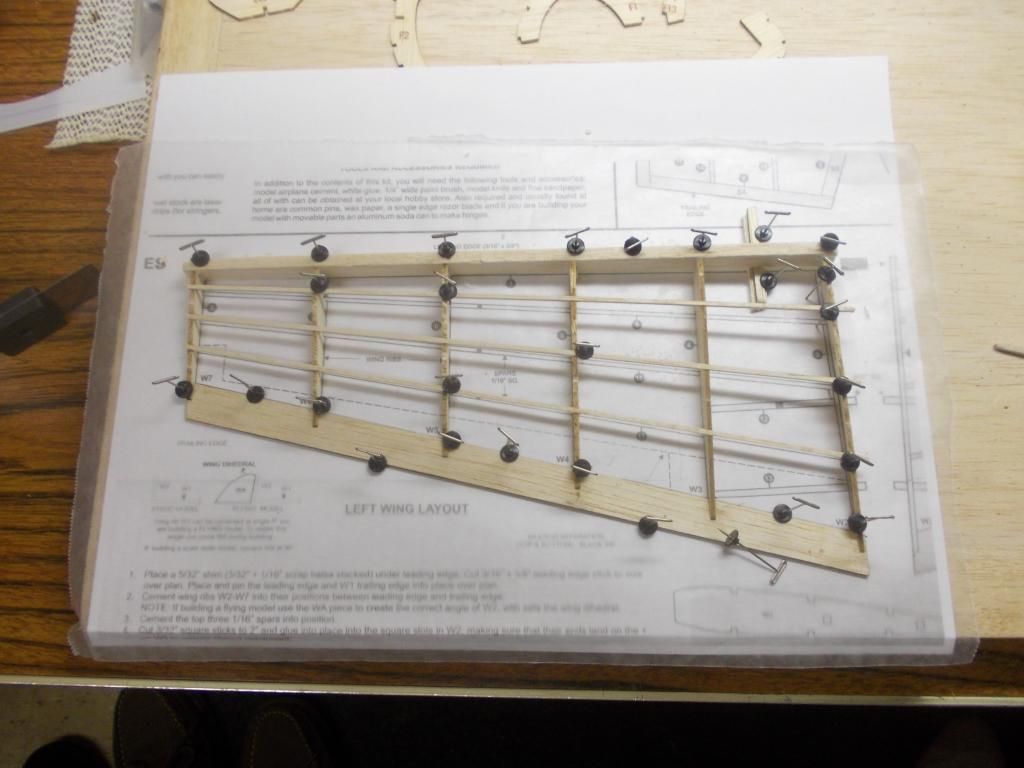
New to the hobby, and new to the forum. I was recently on Amazon looking around and somehow ended up looking at model planes. The 1903 Wright caught my attention and I decided to give it a try. I've built some smaller, simpler models so I wanted to challenge myself a bit. The kit arrived Saturday and I've put in a few hours thus far and have found the process enjoyable. Here are a few progress shots. Any advice is welcome. Being so new I have no idea if what I'm doing looks right, let alone half way decent.

Wings
Image

I painted the ribs so the laser burn wouldn't show through the silk.
Image

Getting the silk onto the wing.
Image

That is where I am as of last night.

Thanks,


Mark
markm
 
Posts: 32
Joined: Thu Mar 27, 2014 12:33 am
Location: Hillsboro, Oregon

Re: 1903 Wright build

Postby Mitch » Tue Apr 01, 2014 8:20 am

Looks good so far.

Did you pin the wing down when you built it?
When you are ready to wet the paper I would plan to secure the wing somehow to keep it from warping as the paper shrinks.

Mitch
Mitch
 
Posts: 1347
Joined: Mon Aug 22, 2011 9:16 pm
Location: Kent, WA

Re: 1903 Wright build

Postby markm » Tue Apr 01, 2014 11:11 am

I made sure to pin as I misted, I initially misted then pinned but I found that it was easier to pin prior so I moved in that direction after the first spray. Both wings have been made, misted and dope applied. I still need to give the bottom wing another coat of dope but things are looking good so far. So many lessons learned already but I'm happy with the progress. I made some of the smaller parts last night, pictures to follow.

I even bought my next build, I can already tell I'm going to love this hobby. I purchased the Focke Wulf FW 190. Hopefully I'm not in over my head with that one!

Second wing getting covered.
Image

Image

Fuselage
Image

Motor mounts and rudders
Image

So far for lessons learned.

Sand the wing ribs or paint entire wing. I painted the laser edges of the ribs and wasn't very careful about keeping the paint strictly on the rib. Some got on the leading edge, you can see that through the covering. I either should have sanded, been more careful or rattle canned the whole wing.

Balsa is fragile. Be extra careful so you don't have to make repairs.

Use the hobby magnifying glass I have instead of straining my eyes.

CA goes a long way. Just the tiniest dot will do.

Mark
markm
 
Posts: 32
Joined: Thu Mar 27, 2014 12:33 am
Location: Hillsboro, Oregon

Re: 1903 Wright build

Postby Mitch » Tue Apr 01, 2014 11:28 am

Very Good...

I use the Opti-Visor with the standard 5 power lens for working on details.

I always sand the entire model and remove all (or most) of the burn mark... I also sand away the numbers and letters on the parts as they will show though the paper.

Is your FW the 500 or 400?

Mitch

PS: If you think balsa is fragile, stay with Guillow kits, the laser cut wood is lighter and better than die-cut, but your will not be ready for competition balsa yet!
Mitch
 
Posts: 1347
Joined: Mon Aug 22, 2011 9:16 pm
Location: Kent, WA

Re: 1903 Wright build

Postby markm » Tue Apr 01, 2014 11:55 am

It's the 500 series and with that said I'm wondering if I made a mistake in buying it verses the 400 laser cut model.

Thoughts?

Mark
markm
 
Posts: 32
Joined: Thu Mar 27, 2014 12:33 am
Location: Hillsboro, Oregon

Re: 1903 Wright build

Postby Mitch » Tue Apr 01, 2014 6:43 pm

Enjoy the kit, even though it is die cut, it should be easy for you to put together. We all hope that Guillow will soon be making those in laser cut! After that one I would suggest the 400 series. They are really impressive when you get them to fly! Enjoy every build and you will improve each time! Mitch
Mitch
 
Posts: 1347
Joined: Mon Aug 22, 2011 9:16 pm
Location: Kent, WA

Re: 1903 Wright build

Postby stx44 » Wed Apr 02, 2014 4:17 am

Theres a lot of comment about how much better the laser cut is than the die cut.

Ive built a number of lasers, and they are great. Currentlly working on the 500 series avenger, and found the die cutting to be just fine. I only had an issue with one piece, and that was more from my poor handling than anything else, and was easily repaired.

I have really enjoyed the 500 Avenger so far (its almost done...)
stx44
 
Posts: 92
Joined: Wed Aug 28, 2013 9:15 am

Re: 1903 Wright build

Postby markm » Wed Apr 02, 2014 12:22 pm

Hi all,

More work last night. Sorry for the daily posts but in a lot of ways this is for me more than you, lol. Until I feel like I have a clue, I want to track progress, blunders, etc.

Worked on finishing up the wings. Both wings have had dope applied twice to each side. They are looking okay but again, lessons learned. I bought the Eze Dope and it creates a lot of tiny bubbles as I brushed that you can see on the wings when you look closely. Its not unsightly but something I will always notice. Perhaps a better brush or a slower, smoother technique would be the answer to that. I also had some of the covering sag when I applied the dope and it stuck to the covering on the other side sealing them together. It is on the lower wing and one of the ends so once hung for display you wouldn't see it, but I will know about it. Again, less haste will probably do wonders.

I also put together the elevators as well as the rudders. I was able to cover the rudders and while the instructions did not mention misting them, I did. I plan to apply dope as well so everything looks the same.

Image

Image

Also started on the elevator struts.

Image

Slower going with the smaller parts.

On a side note, the model I bought from ebay was described incorrectly. I was refunded my money so I am still looking for the next plane. I like the personal aircraft series and am looking hard at the Cessna 170 and the Beechcraft. Haven't decided yet and I could change my mind entirely!

Mark
markm
 
Posts: 32
Joined: Thu Mar 27, 2014 12:33 am
Location: Hillsboro, Oregon

Re: 1903 Wright build

Postby Mitch » Thu Apr 03, 2014 11:50 am

You are doing well... When you can, I would suggest buying some pin clamps:
Image
They fit over a 1 inch "T" pin and can be adjusted to different hieghts, and still have the holding power you need.

They are made by Peck-Polymers and available from several sources. Mitch
Mitch
 
Posts: 1347
Joined: Mon Aug 22, 2011 9:16 pm
Location: Kent, WA

Re: 1903 Wright build

Postby markm » Fri Apr 04, 2014 1:15 am

Thanks for the tip Mitch, I'll do just that. The pins I'm using now leave indentations in the wood when I try and hold things down.

More work done tonight but it's 11, I'm beat, so pictures tomorrow.

Btw, the Cessna won out. Picked one up today at my local hobby shop.

Mark
markm
 
Posts: 32
Joined: Thu Mar 27, 2014 12:33 am
Location: Hillsboro, Oregon

Re: 1903 Wright build

Postby Mitch » Fri Apr 04, 2014 7:31 am

That's great!

Two places you can get the pin clamps are Samsmodels (UK) or Rockytopmodels (USA). If you find them somewhere else let us know. They come in a pack of 28. I have 2 packs and that is sufficient for me when I am building. For larger work I use magnets. The magnets I got from Easybuiltmodels (USA)... They work great aboard my ship as my desk is steel, so I only bring a small board for the tails and small work. If you get magnets you can buy or use a sheet of galvanized steel.

Heading off to Alaska today... back in 12 days...

Mitch :D

PS Shortys Basement (USA) has pin clamps, under: Tools / Miscellaneous... he has them in stock... th th th that's all folks... :D
Mitch
 
Posts: 1347
Joined: Mon Aug 22, 2011 9:16 pm
Location: Kent, WA

Re: 1903 Wright build

Postby davidchoate » Fri Apr 04, 2014 10:40 pm

Looking great so far
davidchoate
 
Posts: 1263
Joined: Wed Aug 14, 2013 6:41 am
Location: PHiladelphia PA

Re: 1903 Wright build

Postby markm » Sat Apr 05, 2014 6:21 pm

Hi all,

Been meaning to post for awhile but life has been busy the last few days. My cousin moved here last Wednesday from Chicago and we have been helping them move in. By the time the evening rolls around it seems like to much of a task to post! Not to much of a task to get a step or two done on the plane, just post about it. haha

I have been working on the Wright and things are moving along. I ran into a few snags but I will tell you about those as we go. So what I have done the last few days....

All struts made.
Image

Elevator parts made
Image

Elevator assembled
Image

Image

Image

Rigging for the rudder
Image

Attached the wings
Image

So here is where I ran into the snags. I finished up what was on the front of the plans and the instructions just stopped. I had enough to do for a night or two before I had to think of next steps. I applied dope to the elevator, rigging to the rudder, etc. But I was scratching my head wondering what to do next. The instructions went from these steps to put it together, or so I thought. Since I didn't know what else to do, I did the rigging on the wings.

Image

Sooooo, I got the rigging on the wings done and realized that you couldn't attach the prop mounts with the rigging done! Oh man what a pain. I had to cut out two sections to attach the mounts. I am in the process of gluing in the rigging in those two areas AGAIN!

I was sitting here at the table just wondering how to get everything together and what braces to make to hold things together. The instructions had been do good up until this part. Then the light turned on, TURN THE PLANS OVER! Sweet mercy, I felt like an idiot. But at least I have some guidance now. lol.

More later.

Mark
markm
 
Posts: 32
Joined: Thu Mar 27, 2014 12:33 am
Location: Hillsboro, Oregon

Re: 1903 Wright build

Postby markm » Tue Apr 08, 2014 11:09 am

Hi all,

Well she's done. About 30 hours into her and lots of lessons learned. So much I would do differently but I also couldn't be happier. Here are some of the steps that have happened over the last few nights....

Small bits made and some painting done.
Image

Adding smaller parts.
Image

Image

Working on the props
Image

Finished. I didn't get any good pics of the rigging last night but its all there.
Image

Image

Image

Image

Image

On to the next build!

Mark
markm
 
Posts: 32
Joined: Thu Mar 27, 2014 12:33 am
Location: Hillsboro, Oregon

Re: 1903 Wright build

Postby solumn_eagle » Tue Apr 08, 2014 1:39 pm

WOW!! Great job! You just made me want to go out and pick up a Wright Flyer today... I'm off to Hobbytown USA :)
solumn_eagle
 
Posts: 20
Joined: Wed Nov 28, 2012 6:14 pm
Location: Atlanta GA

Next

Return to General Building Questions

Who is online

Users browsing this forum: No registered users and 32 guests