Looks good Mitch...
I would be tempted to cover the fuselage wet with only a few pieces. The Guillows style fuselages are hard to warp even when you lighten them up a lot. Obviously the wing is a different story...
Keep it up. Should be a good flier.
My Hellcat, built for one purpose...
60 posts
• Page 3 of 4 • 1, 2, 3, 4
Re: My Hellcat, built for one purpose...
I just got home... I will spray what I have... I am too tired to finish the covering tonight.
I have tried to cover wet and the paper I have falls apart. I like to cover dry, and I pull the paper as tight as I can. I am happy with my results. I think I am doing okay with using half the number of sheets as the Guillow plans show. I will be busy this w/e but should have time to finish up. I will show where my defects are. I am willing to sacrifice a perfect covering because I want less seams.
If I used the silk span, I would cover wet and could stretch that a bit. But this domestic colored tissue does not hold up to that.
I am not worried about warping the fuselage. The problem I have with using larger sheets is wrinkles in the compound curves that do not come out with shrinking.
Here is a pic of the fuselage:
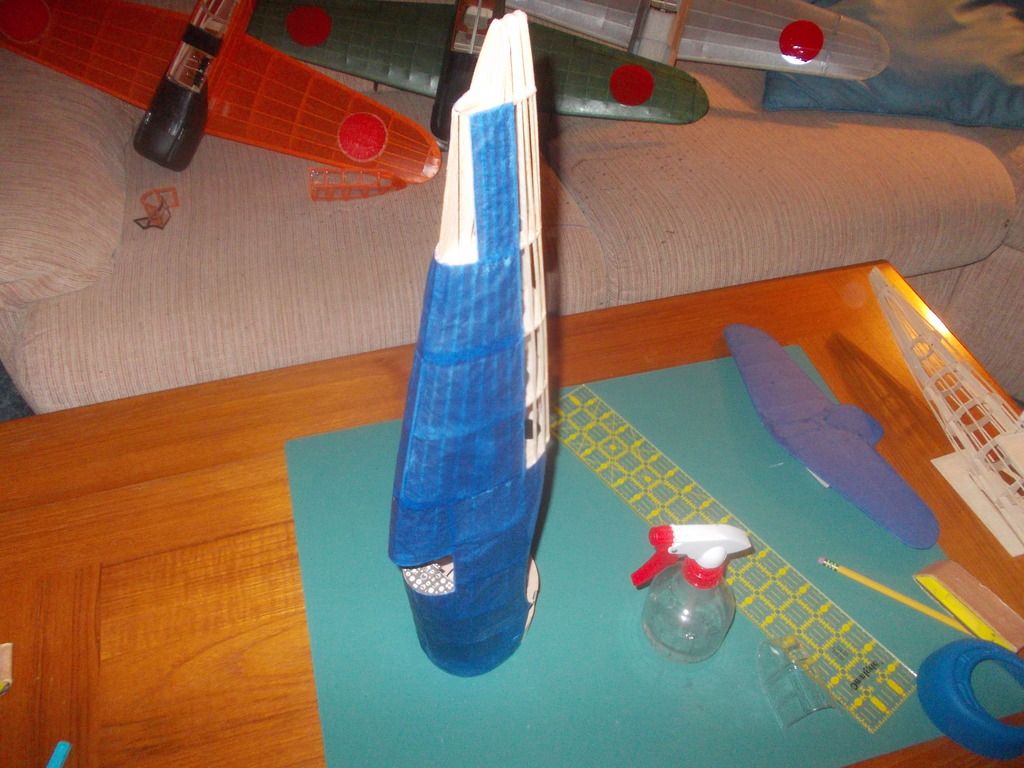
I sanded the bottom, and it is ready for covering, but will add that paper later.
What you see is covered with seven (yes 7) pieces of paper, the model is covered on both sides. I plan to finish it with 3 more pieces. Thats a total of 10. Guillow's plan shows 24. I am happy with that. If you are interested I will show you the break down of my sheets.
Thank you for you interest. Mitch
I have tried to cover wet and the paper I have falls apart. I like to cover dry, and I pull the paper as tight as I can. I am happy with my results. I think I am doing okay with using half the number of sheets as the Guillow plans show. I will be busy this w/e but should have time to finish up. I will show where my defects are. I am willing to sacrifice a perfect covering because I want less seams.
If I used the silk span, I would cover wet and could stretch that a bit. But this domestic colored tissue does not hold up to that.
I am not worried about warping the fuselage. The problem I have with using larger sheets is wrinkles in the compound curves that do not come out with shrinking.
Here is a pic of the fuselage:

I sanded the bottom, and it is ready for covering, but will add that paper later.
What you see is covered with seven (yes 7) pieces of paper, the model is covered on both sides. I plan to finish it with 3 more pieces. Thats a total of 10. Guillow's plan shows 24. I am happy with that. If you are interested I will show you the break down of my sheets.
Thank you for you interest. Mitch
Last edited by Mitch on Tue Nov 10, 2015 2:38 am, edited 1 time in total.
- Mitch
- Posts: 1347
- Joined: Mon Aug 22, 2011 9:16 pm
- Location: Kent, WA
Re: My Hellcat, built for one purpose...
Okay, got the paper on...Here she is...with the IJN planes.
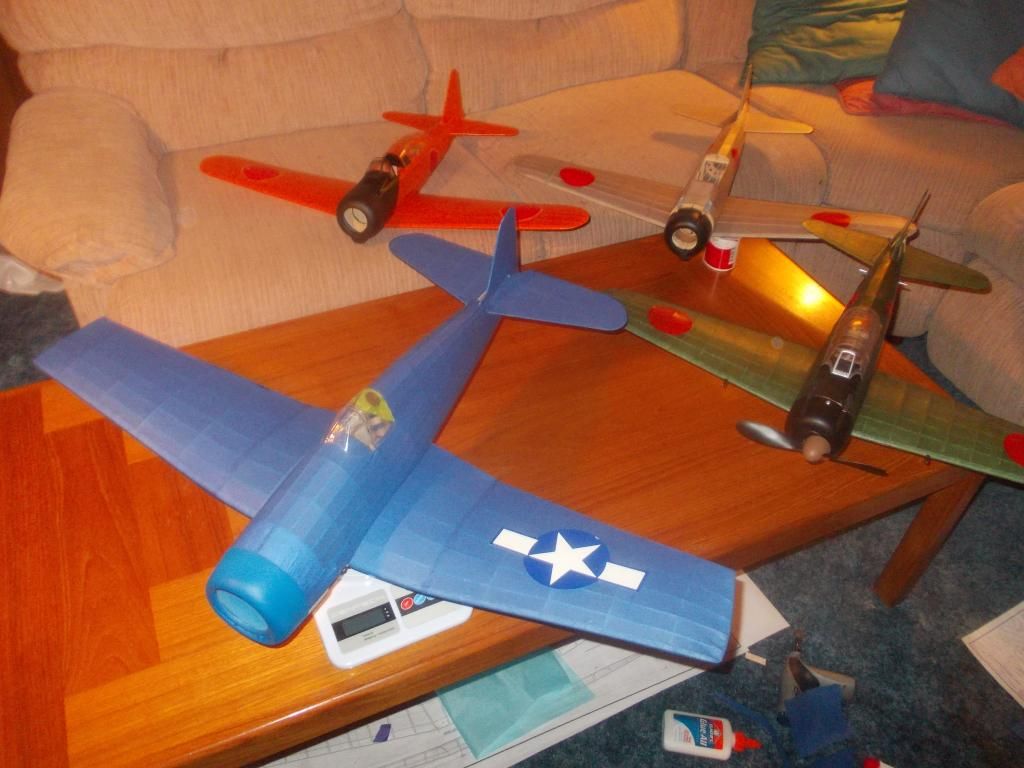
Still a bit more work on the 'cat' but what you see is at 91 grams on the scale now.
Need to:
1. Glue the fuselage to the wing
2. Finish the underbelly
3. Secure the tail
4. Add stringers and paper on the fuselage above the stabilizer
5. Dope and secure decals.
At that point I think I would like to balance and do some test glides.
To finish I just then need to make the front end / thrust adjustment.
I calculate my wing area to be 196.5 square inches This is a big plane... so I think she can carry that weight. I just need to get the proper motor to power 'Big Blue'.
On that thought of how to power this beast, I was just on the phone with an FAC friend. The discussion was about proper motors. There are many factors, but one thought is you want the motor to be between 25-30 % of the total weight of the plane...
...so, if my final plane weighs 120 grams I plan to put in 40 grams of rubber. That would be AUW of 160 grams, of which 40 grams or 25% of the total weight is the motor. To have enough torque to swing that big 10 inch prop I plan to use 4 loops, or 8 strands of 1/8" tan rubber.
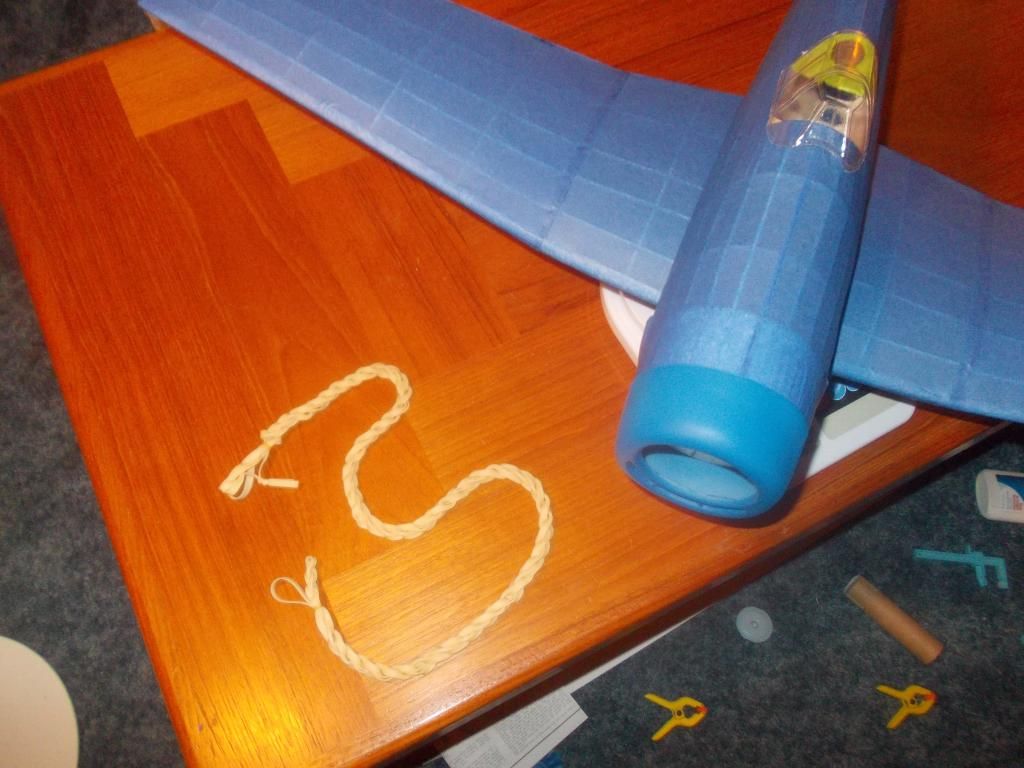
Here is a rubber motor I use for a 400 series. It weighs 25 grams. Also it is about 2 x hook to peg length. It is also 2 loops (4 strands). So the motor for 'Big Blue' will be almost twice as much MASS of rubber, but with 4 loops (8 STRANDS!) it should be shorter, maybe 1.5 x hook to peg. My FAC friend is giving me a vote of confidence and says this plane should fly well!
One more note: IF my planes AUW is 160 grams, with that large wing area that would still be .81 grams per square inch of wing load. Not the best, but still very flyable... We will soon see what the actual numbers are...stay tuned, more to follow. Hope to finish up soon, then test flights!
Mitch

Still a bit more work on the 'cat' but what you see is at 91 grams on the scale now.
Need to:
1. Glue the fuselage to the wing
2. Finish the underbelly
3. Secure the tail
4. Add stringers and paper on the fuselage above the stabilizer
5. Dope and secure decals.
At that point I think I would like to balance and do some test glides.
To finish I just then need to make the front end / thrust adjustment.
I calculate my wing area to be 196.5 square inches
On that thought of how to power this beast, I was just on the phone with an FAC friend. The discussion was about proper motors. There are many factors, but one thought is you want the motor to be between 25-30 % of the total weight of the plane...
...so, if my final plane weighs 120 grams I plan to put in 40 grams of rubber. That would be AUW of 160 grams, of which 40 grams or 25% of the total weight is the motor. To have enough torque to swing that big 10 inch prop I plan to use 4 loops, or 8 strands of 1/8" tan rubber.

Here is a rubber motor I use for a 400 series. It weighs 25 grams. Also it is about 2 x hook to peg length. It is also 2 loops (4 strands). So the motor for 'Big Blue' will be almost twice as much MASS of rubber, but with 4 loops (8 STRANDS!) it should be shorter, maybe 1.5 x hook to peg. My FAC friend is giving me a vote of confidence and says this plane should fly well!
One more note: IF my planes AUW is 160 grams, with that large wing area that would still be .81 grams per square inch of wing load. Not the best, but still very flyable... We will soon see what the actual numbers are...stay tuned, more to follow. Hope to finish up soon, then test flights!
Mitch
- Mitch
- Posts: 1347
- Joined: Mon Aug 22, 2011 9:16 pm
- Location: Kent, WA
Re: My Hellcat, built for one purpose...
Im getting nervous about the first flight LOl .wish you good luck
Ronnie
Ronnie
- r wheatley
- Posts: 81
- Joined: Wed Dec 05, 2007 11:15 pm
- Location: alabama
Re: My Hellcat, built for one purpose...
It will be fine, but my FAC friend said the washout is too much. 
The only thing I am nervous about is finding the last few pieces to finish the fuselage belly!
I hope the plane does not get too heavy during this last phase of assembly.
But now I am off to the Train show to run my model RR with my club!
Mitch, Having fun and Staying young though modeling!
PS: This morning the wing is being glued to the fuselage... If I can find the pieces, the fuselage will be finished tonight!
- Mitch
- Posts: 1347
- Joined: Mon Aug 22, 2011 9:16 pm
- Location: Kent, WA
Re: My Hellcat, built for one purpose...
sounds like fun, I am working on my first train layout HO scale
- r wheatley
- Posts: 81
- Joined: Wed Dec 05, 2007 11:15 pm
- Location: alabama
Re: My Hellcat, built for one purpose...
As for the trains... I am in an HO modular group... I helped break down after our show. We ran trains for 2 days from 10-5 each day! 
Okay... I did not do much, but I have the wing and tail on, and I added the stringers over the tail.
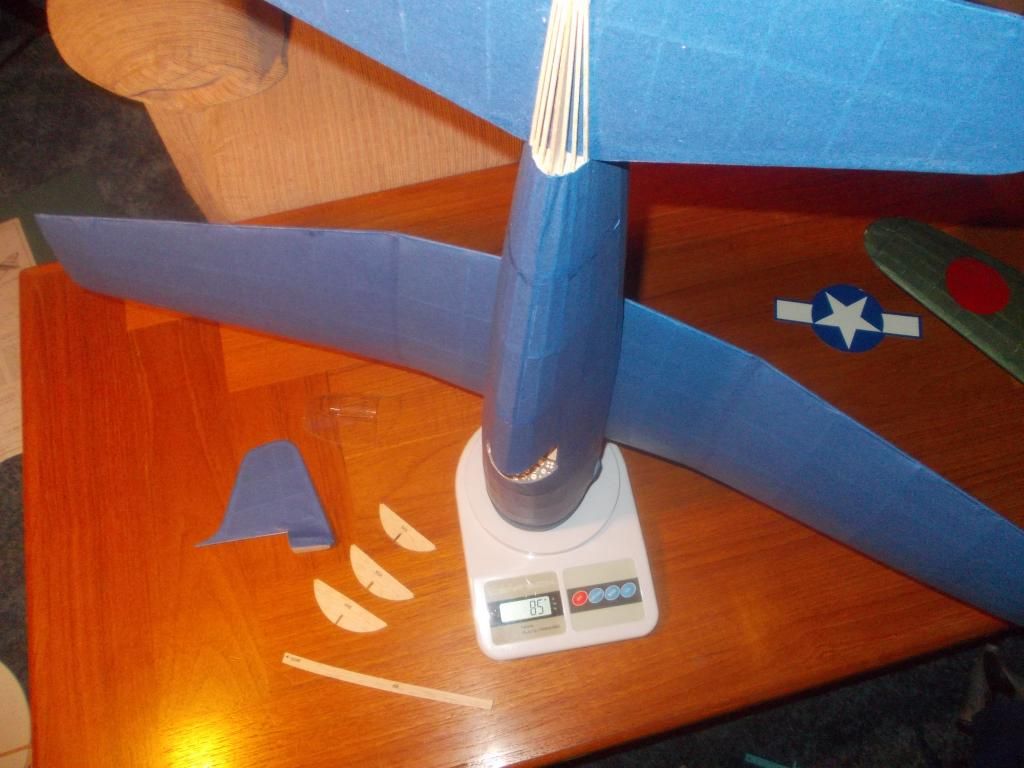
The plane on the scale weighs 85 grams. The rudder and canopy weigh another 5 g.
I found all the underbelly pieces and they weigh 4 grams... But I will lighten them up. I will work on that tomorrow.
I thought the Guillow prop was 10 inches but now I measure it and is looks like 8.75 inches. I will order a few 10 and 12 inch props from EBM tomorrow.
Good Night, Mitch
Okay... I did not do much, but I have the wing and tail on, and I added the stringers over the tail.

The plane on the scale weighs 85 grams. The rudder and canopy weigh another 5 g.
I found all the underbelly pieces and they weigh 4 grams... But I will lighten them up. I will work on that tomorrow.
I thought the Guillow prop was 10 inches but now I measure it and is looks like 8.75 inches. I will order a few 10 and 12 inch props from EBM tomorrow.
Good Night, Mitch
- Mitch
- Posts: 1347
- Joined: Mon Aug 22, 2011 9:16 pm
- Location: Kent, WA
Re: My Hellcat, built for one purpose...
With the large wing area I would think that 4oz would be pretty light, and anything under par for the course. Sounds like you really shaved off a good bit of weight. I have a Comet prop that's 9-7/16" diameter, and it's even blue in color if you want it.
- Bill Gaylord
- Posts: 904
- Joined: Sun Nov 09, 2008 1:29 pm
- Location: Grove City PA
Re: My Hellcat, built for one purpose...
Thanks Bill, but keep your prop. I see EBM has an 11 incher also. I plan to buy a half dozen of 10 inch and another of the 11 inch. I need to have spares, because w/o landing gear sometimes the props break when the plane comes in for a 'landing'. I need to figure out what else I need from EBM, and I'll send in an order.
I have the paper on the rear fuselage now and that is wet, (shrinking). After breakfast I will finish the under belly structure. Hopefully latter today I will dope the model and get the decals on. I still need to construct the front end/thrust adjustment, but not counting that I might get the plane built under 100 grams!
When she has 3 coats of dope on, I will balance with clay. Then I will now how much material (in weight) I can build into the nose. I still want a little room for ballast, and I DO NOT want to have to add ballast to the tail.
More at the end of the day... Mitch
UPDATE: You saw these parts in the above photo. Came out of the sheet at 4 grams. A bit of sanding and removing the 'excess wood'. Now the parts weigh a total of 2 grams. This is an example of how I built this entire model... All for the quest of 'ONE PURPOSE' and that is maximum free flight time!
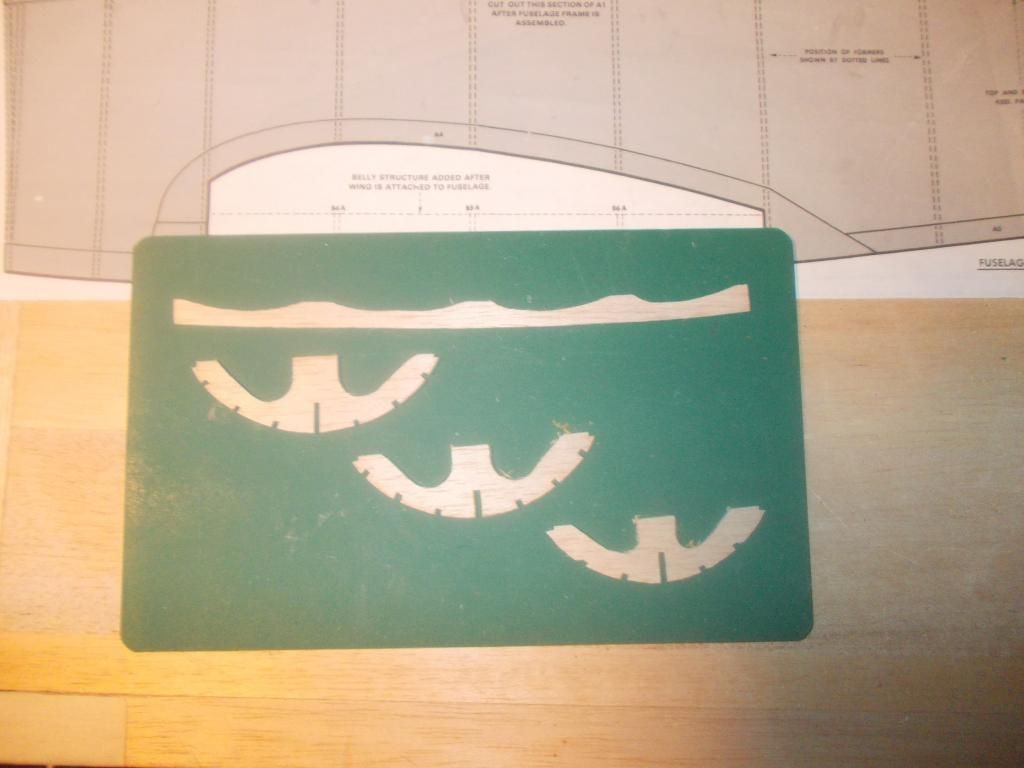
The plane should be finished and ready for doping today!
I have the paper on the rear fuselage now and that is wet, (shrinking). After breakfast I will finish the under belly structure. Hopefully latter today I will dope the model and get the decals on. I still need to construct the front end/thrust adjustment, but not counting that I might get the plane built under 100 grams!
When she has 3 coats of dope on, I will balance with clay. Then I will now how much material (in weight) I can build into the nose. I still want a little room for ballast, and I DO NOT want to have to add ballast to the tail.
More at the end of the day... Mitch
UPDATE: You saw these parts in the above photo. Came out of the sheet at 4 grams. A bit of sanding and removing the 'excess wood'. Now the parts weigh a total of 2 grams. This is an example of how I built this entire model... All for the quest of 'ONE PURPOSE' and that is maximum free flight time!

The plane should be finished and ready for doping today!
- Mitch
- Posts: 1347
- Joined: Mon Aug 22, 2011 9:16 pm
- Location: Kent, WA
Re: My Hellcat, built for one purpose...
mitch, is there a good alternative to using dope ?
Ronnie
Ronnie
- r wheatley
- Posts: 81
- Joined: Wed Dec 05, 2007 11:15 pm
- Location: alabama
Re: My Hellcat, built for one purpose...
There are alternatives. I said 'dope' as the generic term for sealing the paper. I know some people and Guillow suggests using a watered down white glue. I still have some cans of dope and that needs to be thinned with the appropriate thinner or retarder. I have found a new product and am using it, and like the ease of application.
I found this at a Hobby Shop that has RC airplanes. It is in spray can, by TopFlite, called LusterKote. It smells like dope, so I believe it is a similar compound, but I just spray on 2 light coats then 1 heavy coat. That is as per instructions on can. I will spray the entire model after it is all assembled. I will stuff paper towels in the cockpit so as not to apply the 'dope' where I do not need it. I am always trying to keep everything as light as possible. Then I will apply the decals. When the paper is sealed well with a smooth glossy finish the decals should stick.
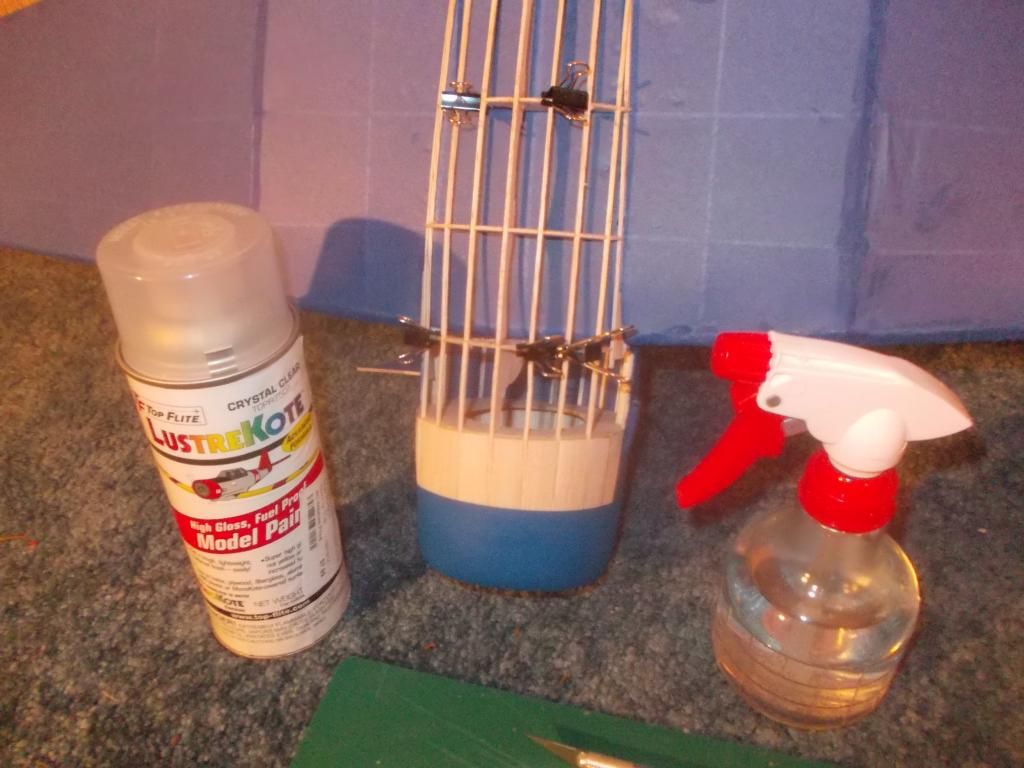
The lusterkote costs about $8.00, and I think will be enough to cover 4, 400 series planes. The 'cat' is getting her bottom stringers. The spray bottle is water.
I found this at a Hobby Shop that has RC airplanes. It is in spray can, by TopFlite, called LusterKote. It smells like dope, so I believe it is a similar compound, but I just spray on 2 light coats then 1 heavy coat. That is as per instructions on can. I will spray the entire model after it is all assembled. I will stuff paper towels in the cockpit so as not to apply the 'dope' where I do not need it. I am always trying to keep everything as light as possible. Then I will apply the decals. When the paper is sealed well with a smooth glossy finish the decals should stick.

The lusterkote costs about $8.00, and I think will be enough to cover 4, 400 series planes. The 'cat' is getting her bottom stringers. The spray bottle is water.
- Mitch
- Posts: 1347
- Joined: Mon Aug 22, 2011 9:16 pm
- Location: Kent, WA
Re: My Hellcat, built for one purpose...
I'm wondering, since you seal after assembly, if you use a jig of sorts to make sure the frames stay where you want them? Even if the dope isn't shrinking, I find it still does make the tissue go slack some before tightening back up.
- ADW 123
- Posts: 1158
- Joined: Mon Feb 22, 2010 5:22 pm
- Location: Cincinnati, Ohio
Re: My Hellcat, built for one purpose...
Has anyone every tried shrinking tissue with a high power hair dryer, after spraying dope or clear? I have no idea how it would work for tissue, but the lightweight covering I use relaxes like a prune when painting, and the hair dryer shrinks it drum tight afterward.
- Bill Gaylord
- Posts: 904
- Joined: Sun Nov 09, 2008 1:29 pm
- Location: Grove City PA
Re: My Hellcat, built for one purpose...
Well, here she is:
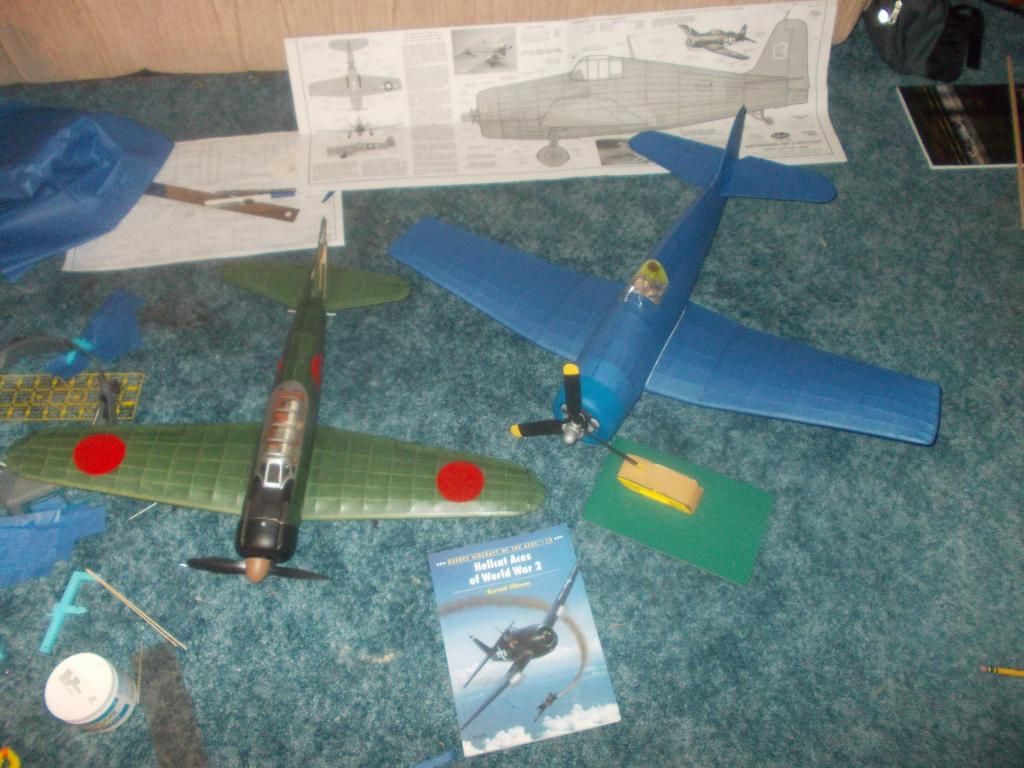
I did the best I could with the materials I used and my current skill level. The Zero I built about 2 years ago weighs about 100 g AUW, The Hellcat which is much larger (same scale) now weighs in at 95 g With some dope and decals she will top 100 g. I think it may take as much as 20 g to get her in balance. So I can add a lot of material in the nose / thrust adjustment with no penalty. So as I said if I can get 25% of the AUW in motor, that would require 40 g of rubber... Well we will see if I can get all that in.
As far as sealing the paper... I only started doing it with the spray recently. My past 5 or 6 planes (and repairs) I consider all the shrinking is done with the water. Maybe that's why they say 2 light coats, then 1 heavier coat. I am just getting on a mist at first. With doing that twice I make sure the model is covered. Then the paper is really sealed already before my 3rd and final and heavier coat. We will see how it works out
As far as using a hairdryer... I have not done so for shrinking the paper. However for changing the shape of the wing (Adding washout) Don DeLoach helped me the night before WESTFAC IV. At that time I knew little about washout. He looked at my planes and added washout to the Afrika Korps Me 109. That plane although had a hand cut wing. Although the same number of ribs they are 1/32 and all the wood is hand selected. He got the washout he wanted.
He then tried to add washout to my P-51 Mustang 'Miss B. Haven" (this plane was built before my 109 and built as per Guillows) Don was unable to get the washout in the wing. The wing was that stiff and strong. He was trying so hard we finally heard a "crack" at that point he stopped.
My 109 flew for 38 seconds, and made it to the final round. My P-51 flew for 6 seconds and was out in the first round. This is when I finally realized these Guillow kits need major renovation for competition flying.
I think we used the hair dryer because one was in the hotel room. On another trip my friend Tom Arnold achieved the same results over heat from the stove. Latter I have done the same and I use a pot of steaming water.
Mitch
UPDATE: Not much done today but I did cover the window frames:
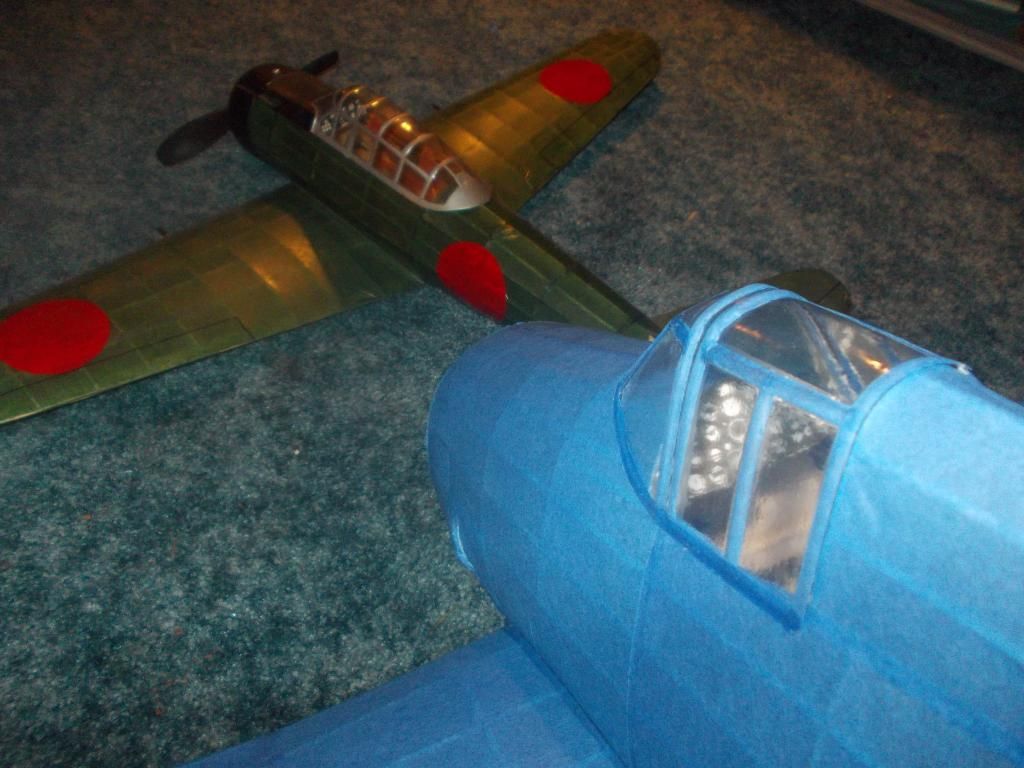
It has been VERY damp here in Seattle. I plan to 'dope' on Thurday. Should be a dry day here...

I did the best I could with the materials I used and my current skill level. The Zero I built about 2 years ago weighs about 100 g AUW, The Hellcat which is much larger (same scale) now weighs in at 95 g With some dope and decals she will top 100 g. I think it may take as much as 20 g to get her in balance. So I can add a lot of material in the nose / thrust adjustment with no penalty. So as I said if I can get 25% of the AUW in motor, that would require 40 g of rubber... Well we will see if I can get all that in.
As far as sealing the paper... I only started doing it with the spray recently. My past 5 or 6 planes (and repairs) I consider all the shrinking is done with the water. Maybe that's why they say 2 light coats, then 1 heavier coat. I am just getting on a mist at first. With doing that twice I make sure the model is covered. Then the paper is really sealed already before my 3rd and final and heavier coat. We will see how it works out
As far as using a hairdryer... I have not done so for shrinking the paper. However for changing the shape of the wing (Adding washout) Don DeLoach helped me the night before WESTFAC IV. At that time I knew little about washout. He looked at my planes and added washout to the Afrika Korps Me 109. That plane although had a hand cut wing. Although the same number of ribs they are 1/32 and all the wood is hand selected. He got the washout he wanted.
He then tried to add washout to my P-51 Mustang 'Miss B. Haven" (this plane was built before my 109 and built as per Guillows) Don was unable to get the washout in the wing. The wing was that stiff and strong. He was trying so hard we finally heard a "crack" at that point he stopped.
My 109 flew for 38 seconds, and made it to the final round. My P-51 flew for 6 seconds and was out in the first round. This is when I finally realized these Guillow kits need major renovation for competition flying.
I think we used the hair dryer because one was in the hotel room. On another trip my friend Tom Arnold achieved the same results over heat from the stove. Latter I have done the same and I use a pot of steaming water.
Mitch
UPDATE: Not much done today but I did cover the window frames:

It has been VERY damp here in Seattle. I plan to 'dope' on Thurday. Should be a dry day here...
- Mitch
- Posts: 1347
- Joined: Mon Aug 22, 2011 9:16 pm
- Location: Kent, WA
Re: My Hellcat, built for one purpose...
Well we finally had a nice sunny day in Seattle on Saturday. And although my day was full, I took the Hellcat outside and got 3 coats of dope on her.
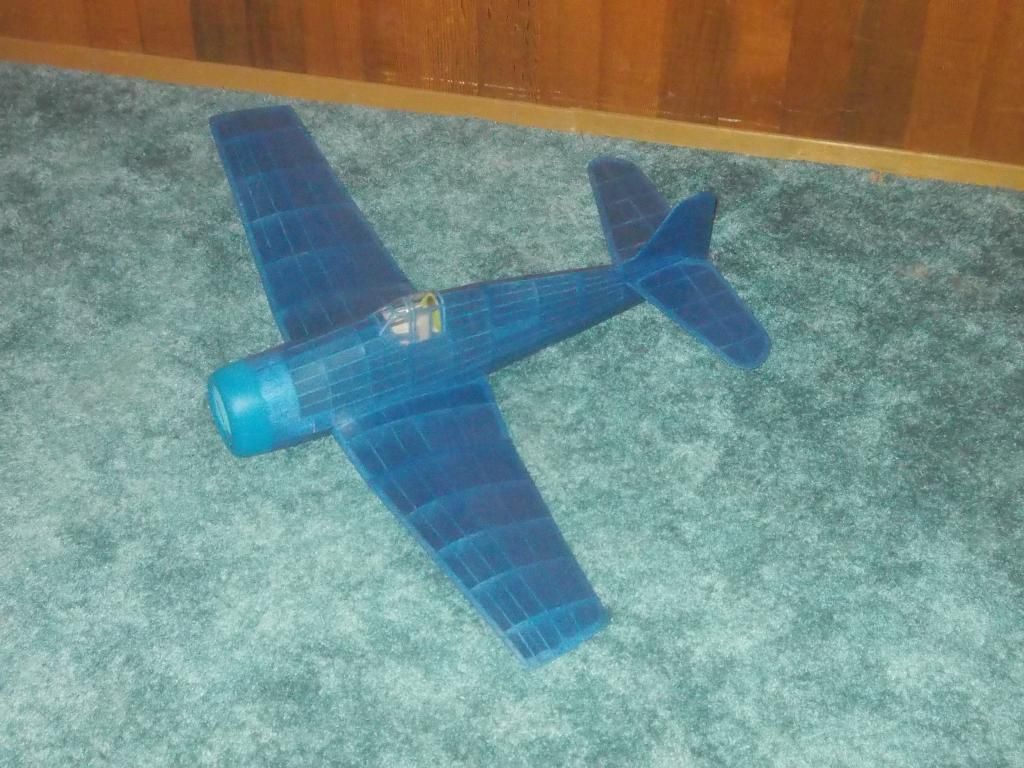
At this point what you see here weighs exactly 100 grams. Still need front end installed, prop and rubber and balance.
I was hoping for one more day of sunshine to get some glides in, but no such luck. Today it is raining again. At this point I plan to use the decals as templates and add bond paper "Stars and Bars" I find that with not so much dope I have dificulty with applying large decals.
After the insignia and numbers are on I will spray on another coat of dope.
FYI: The models was all glued together when I sprayed on dope. (Except for canopy and cowling) 3 light coats. although the paper sagged a little when doped I did not brace or jig the model in any way. I believe all the shrinking has been done with the water. I set the model on her nose (w/o plastic cowl) to stand and dry.
Mitch
- Mitch
- Posts: 1347
- Joined: Mon Aug 22, 2011 9:16 pm
- Location: Kent, WA
60 posts
• Page 3 of 4 • 1, 2, 3, 4
Return to General Building Questions
Who is online
Users browsing this forum: No registered users and 4 guests
