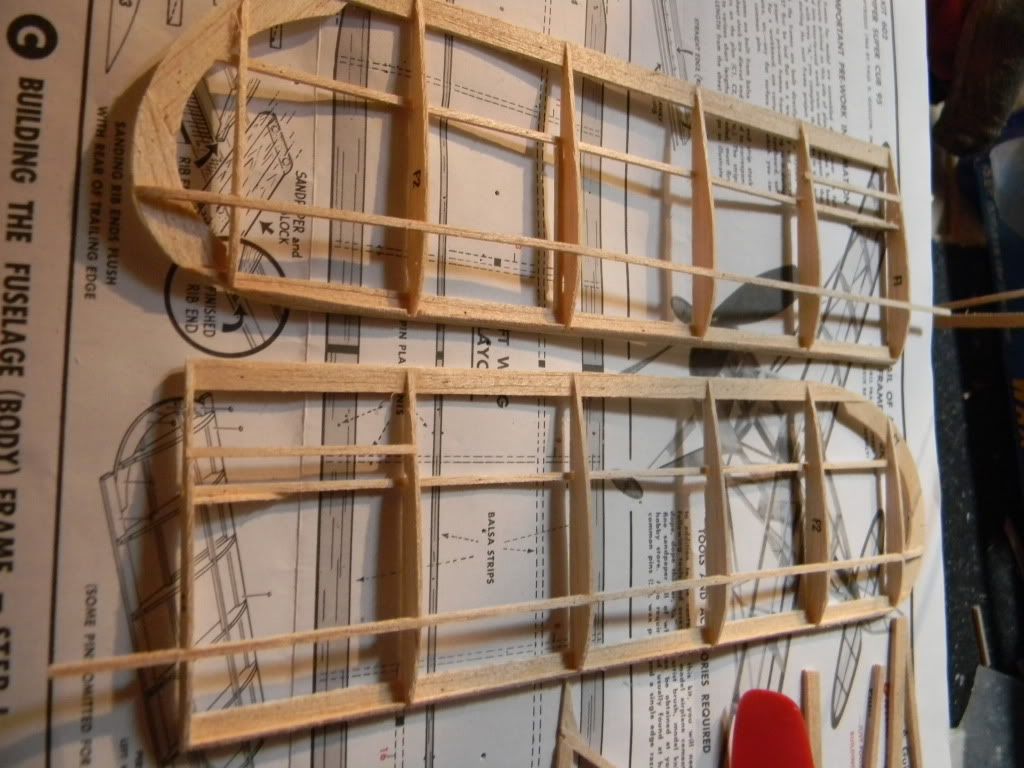
I nearly done with the frame of my Cessna 180.
I assembled the two fusalage halves, joined the tail ends, and glued in the bulkheads (formers) B1 through B7.
I glued in the die cut longitudinal parts A5 through A7 . . . except for A6.
Glued in the short pieces cut from strips.
The questions start with A6, which fits between cross member "10" and bulkhead B3. Does it the rear end go INTO the center notch of B3, or is that spot reserved for the top center stinger? The side and top views aren't very clear on this.
How are the two bottom stringers joined to each other and to the bottom of the tail?
Ditto with the three top stringers and the top of the tail.
Pieces 23 and 24, cut from the widest strip stock, fit ahead of B3, and to either side of A6. But where, vertically? Even with the top of A6 and the top edge of the fusalage halves?
Any help appreciated!
Thanks
Stefan
Cessna 180 (kit 601) build questions
61 posts
• Page 1 of 5 • 1, 2, 3, 4, 5
Ugh, and to rub things in, I don't have enough long pieces of stringer material to make the required five stringers. I think I used the wrong material on my horizontal stab.
I could either cut new ones from 1/16" stock or laminate two of the smaller strips together.
I'm going to be a lot more organized with my materials on my next build!
I could either cut new ones from 1/16" stock or laminate two of the smaller strips together.
I'm going to be a lot more organized with my materials on my next build!
- StefanJ
- Posts: 108
- Joined: Mon Feb 28, 2011 9:46 am
alright, the rear end go into the center notch of B3. there is usually a cross member that goes where the wing is mounted. there is usually a space left (1/16") for the wing to slide into. another piece, (a6) goes from the notch at b3, (stuck right onto the edge, not in the notch) to this cross member by the wing. note that some sanding may be required to make it fit. make sure you put the cross memebr in the right place.
Follow?
the tops of the two bottom stringers (the skinnier side usually 1/16") go toward the the fuse. they should be stuck right next to eachother (yes side by side) at the tail, and glued to the tail itself. when glue dries well, trim the excess and then sand it so there is nothing hanging over the edge. same thing with the top.
the widest sstrip stock goes horazontally next to a6 and b3.
i hope these answer your questions. hopfully they are accurate, as most the series this kit belongs in follow similar building patterns.
Alex
- ADW 123
- Posts: 1158
- Joined: Mon Feb 22, 2010 5:22 pm
- Location: Cincinnati, Ohio
Thanks, Alex, I think that answers the questions, except for one detail:
The wide strip stock panels glued adjacent to A6 and B3. Are they aligned with the top edge of these pieces? I believe they are, but I want to be sure.
I measured the stringer stock. It appears to be 1/16" by 3/32". I should be able to cut this from my copious supply of balsa.
(I have lots and lots of sturdy C-grain balsa in 3/16" and 1/4" sheets, for making rocket fins, but I know I have some light duty stock in there!)
The plans-as-printed have some ambiguity that can only be remedied by experience. e.g., the question of whether the die-cut piece or the stringer goes in a former notch. This is going to be an issue with the bottom stringers; I put the A7 pieces into the notches of the former used to mount the landing gear.
I'm going to be a lot more careful with my next build, an "Arrow."
Thanks,
Stefan
- StefanJ
- Posts: 108
- Joined: Mon Feb 28, 2011 9:46 am
the two strips of the thickest strip stock should line up with the top. as for the a6 piece. it should line up with the top of b3 and the top of the cross member where the wing should mount. i believe that as for the bottom, the a7 pieces should go into the notch on the formers. the "butts" of the stringers should line up neatly with the other side of whatever part specifically has the landing gear attached to it. but i also think that since you sandwiched the two balsa formers together with the landing gear, the a7 parts go inside of the nearest former. then, the stringers on the bottom fit into the notches on the former that if faceing the tail of the plane. then the butts of the stringers meet with a7, wich the backs of the a7s are flush with the former that is facing the front. either way, it tends to work out alright. its been a while since ive built this kit in particular, but thats how i think it goes together. post pics of you build when you done! 
- ADW 123
- Posts: 1158
- Joined: Mon Feb 22, 2010 5:22 pm
- Location: Cincinnati, Ohio
I started posting more photos to my Flickr set:
http://www.flickr.com/photos/stefan_e_j ... 283296828/

I bought some cheap colored tissue from Penn Valley for the models in my build queue. The upper surfaces of the wings and stab will be yellow. The blue I bought for the fuselage turned out to be a bit too bright, but when the heck.
The wings and rudder came out OK so far. The fuselage tissuing is the real challenge. Covering all those little panels is tedious. I need to sand away the excess around the existing panels so I can paper the rest of it.
http://www.flickr.com/photos/stefan_e_j ... 283296828/

I bought some cheap colored tissue from Penn Valley for the models in my build queue. The upper surfaces of the wings and stab will be yellow. The blue I bought for the fuselage turned out to be a bit too bright, but when the heck.
The wings and rudder came out OK so far. The fuselage tissuing is the real challenge. Covering all those little panels is tedious. I need to sand away the excess around the existing panels so I can paper the rest of it.
- StefanJ
- Posts: 108
- Joined: Mon Feb 28, 2011 9:46 am
looking good. make sure you hold down those parts by any means (pins etc.) when shrinking and dopeing so that the dont warp if you are gunna fly it. i would recoment the same if you are going to display.
if you are gunna fly it, i would put some diferential washout onto the wings if you want a nice turn... i dont think you have specified if its static or for flight, or maybe im not looking close enuff...
if you are gunna fly it, i would put some diferential washout onto the wings if you want a nice turn... i dont think you have specified if its static or for flight, or maybe im not looking close enuff...
- ADW 123
- Posts: 1158
- Joined: Mon Feb 22, 2010 5:22 pm
- Location: Cincinnati, Ohio
you just need to sand it so the the ribs blend neatly. see here:

i raised the edge on this one, but it doenst matter. i hope you can see how it front of the ribs blend neatly with the LE.
its extremely important that you make sure that ALL of them blend in the best you can, otherwise some small wrinkles will form around the "bump" that it creates
here, the front of the ribs were not blended properly, and i got some little wrinkles there. it wont stop it from flying, but if you want it to look pretty....

sorry these werent of cesna 180s, hope this has helped
Alex

i raised the edge on this one, but it doenst matter. i hope you can see how it front of the ribs blend neatly with the LE.
its extremely important that you make sure that ALL of them blend in the best you can, otherwise some small wrinkles will form around the "bump" that it creates
here, the front of the ribs were not blended properly, and i got some little wrinkles there. it wont stop it from flying, but if you want it to look pretty....

sorry these werent of cesna 180s, hope this has helped
Alex
- ADW 123
- Posts: 1158
- Joined: Mon Feb 22, 2010 5:22 pm
- Location: Cincinnati, Ohio
61 posts
• Page 1 of 5 • 1, 2, 3, 4, 5
Return to General Building Questions
Who is online
Users browsing this forum: Bing [Bot] and 14 guests


