Cessna 180 (kit 601) build questions

Ask other modelers for a little help / knowledge ?

Postby StefanJ » Thu Apr 07, 2011 2:51 pm

Luckily, I have two cork boards for plan mounting, so I'll have a place to pin down the pieces when I dope the tissue! (The other has my Arrow plans already laid out.)

if you are gunna fly it, i would put some diferential washout onto the wings if you want a nice turn...


Yup, it will be a flyer. I'm not sure what you mean by differential washout. Mount the wings with a different dihedral? Or with a very slightly different angle of attack?

Thanks,

Stefan
StefanJ
 
Posts: 108
Joined: Mon Feb 28, 2011 9:46 am

Postby Phugoid » Thu Apr 07, 2011 3:20 pm

Phugoid
 
Posts: 952
Joined: Wed Jan 20, 2010 8:17 am

Postby Phugoid » Thu Apr 07, 2011 3:25 pm

Oops, I pressed post too early.....

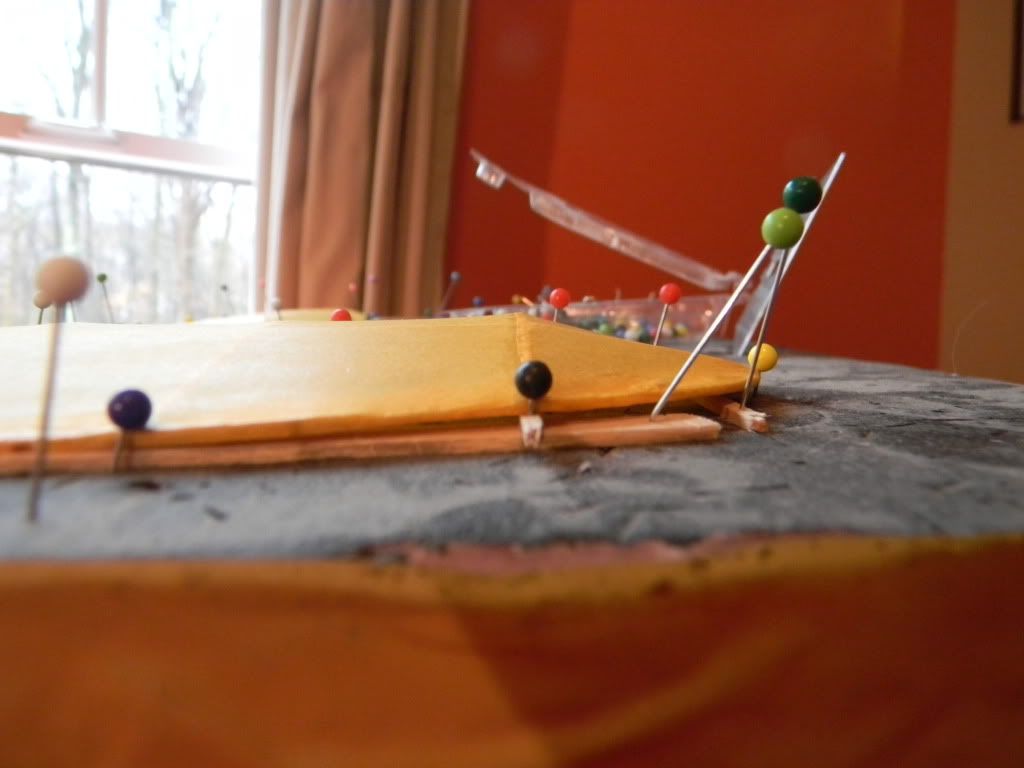
About half way down, it shows the application of washout using a shim under the trailing edge of the wing.

The idea of washout is to reduce the angle of attack of the wing at the tip so that the tip stalls last, this make the model more stable in flight, and is complimentary to dihedral. Differential washout can be used to make one wing lift more that the other inducing a turn, or to prevent a wing "dipping in" when you use the rudder to make a turn.....
Phugoid
 
Posts: 952
Joined: Wed Jan 20, 2010 8:17 am

Postby ADW 123 » Thu Apr 07, 2011 3:40 pm

hope you can see the shim here, stefanj. i like visuals, and just so you get an idea i got myself a jig here with my wing in it. the shim just goes right under the TE. i used 1/16" on the right wing, and 1/32" on the left. (if you are going for a left turn.)

gotta give phugoid some credit... he has tought me a lot of what i know....

Image

i like just useing some gypse foam for it, so i can stick my pins down all the way if i need to.
ADW 123
 
Posts: 1158
Joined: Mon Feb 22, 2010 5:22 pm
Location: Cincinnati, Ohio

Postby Phugoid » Thu Apr 07, 2011 3:51 pm

ADW's differential washout set up would actiually make the model turn right, (not left!) It will also stop the left wing from "dipping in" on the left turn. The left turn either comes from the rudder setting, or "naturally" from the prop torque.
Phugoid
 
Posts: 952
Joined: Wed Jan 20, 2010 8:17 am

Postby ADW 123 » Thu Apr 07, 2011 3:54 pm

was stefanj going for a right turn? i figured that the one i just described would normally make it go right, with NO rudder input. thats why we put a tab or angle the prop (if you are trimming for a left turn) then, it will keep the wings level. correct me if im wrong....
ADW 123
 
Posts: 1158
Joined: Mon Feb 22, 2010 5:22 pm
Location: Cincinnati, Ohio

Postby Phugoid » Fri Apr 08, 2011 6:46 am

ADW you are correct, but you could cause confusion since you sort of implied that the washout was the source for the turn, not neccesarily a means of controlling and stabilizing it.......

I pretty well almost always trim left, (unless the model has other ideas) it's easier IMO
Phugoid
 
Posts: 952
Joined: Wed Jan 20, 2010 8:17 am

Postby StefanJ » Tue Apr 12, 2011 3:17 pm

Gar frapping dangit!

I was trimming excess tissue from bottom edge of the fuselage when a clawed a big hole right in the tightened tissue.

I took off the whole panel and will start again.

Now, just to be sure . . . which way should the tissue grain run on a fuselage? Along the body or from right to left?
StefanJ
 
Posts: 108
Joined: Mon Feb 28, 2011 9:46 am

Postby ADW 123 » Tue Apr 12, 2011 3:26 pm

lengthwise to the body
ADW 123
 
Posts: 1158
Joined: Mon Feb 22, 2010 5:22 pm
Location: Cincinnati, Ohio

Postby StefanJ » Fri Apr 15, 2011 2:14 pm

Damaged panel replaced per advice, thanks! The "spot of glue on the ends" technique worked nicely.

Now, another question! The Cessna's fuselage has side panels with lots of balsa sheet. Is the same "put the glue on just the edges" technique still applicable? Should I put glue around the edges of window frames?

I'm tempted to put the celluloid window material on the inside of the side windows.
StefanJ
 
Posts: 108
Joined: Mon Feb 28, 2011 9:46 am

Postby ADW 123 » Fri Apr 15, 2011 2:41 pm

ok first for the sides you will do the same thing as you would with the tail feathers, assumeing they arent built up.

you are going to put thinned glue all around the outer edges of the frame. only make the lines of glue on the outside about 1/8". the lest glue, the better. you can see how i did just that on the bottom of the elevator and rudder sides on page three in my arrow build. this method works very well. it is important to make sure it is stuck down really well. if it isnt, just take a little thinned glue on the brush and put it on the very outermost edge you can get. this will hold it down.

as for the windows, CUT OUT A PAPER ONE FIRST. you can thank me later. dont waste the plastic in the kit until yo uhave made accurate paper paterns. all you will do is lightly tape them onto your plane, and make necessary cuts and what not to make sure the paper fits. then, copy the new paper patern onto the clear plastic by any means necessary. then, you can put on the plastic on the OUTSIDE of the fuse area.

now you can deal with it puting it on. cepillary action will be a major player for putting it on. i would first get yourself some "canopy glue". CA will fog the canopy.
ADW 123
 
Posts: 1158
Joined: Mon Feb 22, 2010 5:22 pm
Location: Cincinnati, Ohio

Postby StefanJ » Sat Apr 23, 2011 12:27 pm

I tacked the side panels onto the fuselage. I'm still not sure how to handle the window holes . . . do I spread some glue around the edges, so the tissue tacks to them?

The wing tissuing is almost complete. I put the wing tip panels on this morning. There are some wrinkles in the wing tissue which persisted after shrinking; I suspect this is due to slight irregularities in the frame and to a slightly messy glue job. Live and learn!

The rudder and stab just got their first coat of thinned clear dope.
Image
StefanJ
 
Posts: 108
Joined: Mon Feb 28, 2011 9:46 am

Postby ADW 123 » Mon Apr 25, 2011 2:03 pm

good job stefanj. you dont have to put pins through the parts, just for sakes of how clean it will look when its done. you can just stick them next to them either angled toward the part to hold it down, or if the board is deep enuff iw ould just go all the way in and hold the part down with the round head of the pins.
ADW 123
 
Posts: 1158
Joined: Mon Feb 22, 2010 5:22 pm
Location: Cincinnati, Ohio

Postby Seeker » Mon Apr 25, 2011 8:03 pm

I'm seeing numerous references to thinned glue, but I'm not sure why?

Why would one cut glue with water? Doesn't it make for a weaker glue?

What's the aim/purpose?
Seeker
 
Posts: 66
Joined: Tue Mar 15, 2011 7:03 am

Postby ADW 123 » Mon Apr 25, 2011 8:47 pm

for one, less glue looks better. i have tried both full strength glue and thinned glue in simmilar methods and found that thinned is def. the way to go.
ADW 123
 
Posts: 1158
Joined: Mon Feb 22, 2010 5:22 pm
Location: Cincinnati, Ohio

PreviousNext

Return to General Building Questions

Who is online

Users browsing this forum: No registered users and 2 guests